Building a Hackable To-Do App: Flask Development for Cyber Enthusiasts & Students
This is for students that is passionate about making applications and solutions, but do not really know where to start. (Or fellow security nerds that just wants to learn more!)
BLOG
5/27/202414 min read
The goal for this blog post, is to share and hopefully teach you how to easily host your own web application with Python Flask. This has thought me a lot about how the backend and frontend developers are thinking, as this puts you in their shoes. I also learned about why certain vulnerabilities are implemented by accident, as it is not always obvious how they work if you do not have enough knowledge about them.
I think it is important to not only be able to find vulnerabilities, but also be able to communicate them properly and understand the full picture. This is a habit of thinking I inherited from my Bachelor thesis that was about Purple teaming, as I saw the value of having everyone on board when a test-case lead to a finding.
There is a glossary in the end of document with useful links and explanations of words, make sure to check it out!


I am been a big fan of TryHackMe challenge rooms. Blindly diving into a web application, running port scans, fuzz directories/files and finding assets you are not supposed to find and hopefully detecting an outdated service or tool that you can exploit to get into the server running in the background. The rush of being able to do this without any help or the joy of reading skillful peoples write-ups where they share their process and methodology is the main drive for making my first vulnerable CTF application.
The concept is simple. Make a vulnerable web application where you have multiple different ways to pwn and perform different vulnerabilities. I take inspiration from the well known framework Owasp Top 10 and common vulnerabilities I have found in the wild.
This CTF is aimed for fresh students within the Cyber Security field and other beginners, I used some obvious vulnerabilities that you can easily spot if you have read about them before looking for them. (And made sure to add clear hints in the challenge description). I wanted the student to read the hint, do research about the vulnerability, then try to look for it and use it.
Here is a list in order and some thoughts I had about them (Note that write-ups on how to perform them can be found in the last chapter):
Easy: HTML manipulation
This is a straight forward and classic vulnerability I have seen in the wild too many times. It is easy to perform and can lead to the user getting access to resources they are not supposed to or get settings they are not authorized of using.Medium: IDOR
IDOR is a well known vulnerability that is easy to detect if you know what too look for. I made sure to have it in the GET request, as it is way easier to spot here.Medium: JWT secret Cracking
JWT is a token solution that a lot of web applications use. If implemented correctly, it is a safe and easy to use token solution, but if misconfigured or used with a weak secret, it can lead to devastating results. This is what I did in this web app, as I wanted the users to bruteforce and crack the secret.Hard: Admin account takeover
This is a follow-up challenge to the JWT secrets cracking challenge. With the knowledge about what the secret is, you can use it to perform account takeover and become any user on the application. In the challenge, I wanted the player to take over a specific account that would give them access to a "secret" resource.(Ekstra) Hard: LFI
This is a extra challenge for those who wanted to dive deeper into the server backend and read files outside of the app. I had to add a restriction on which files the players were able to read, to make sure players did not cheat and read the source code for the application and get the flags directly.
List of challenges removed from the original:
XSS:
This vulnerability is fun and can be used for plenty of challenges! The original idea was to have a simulated admin visit its note every minute, giving the player the opportunity to send their cookies to an external server, then use it to gain access to their account. This was removed because I learned that the application would be hosted as a single instance, which means that all players could attack each other and redirect players to potential malicious websites.RCE:
The idea here was to be able to root the machine and gain access to the server and steal the flag that would be hidden in the Linux root directory. This had to be removed as this meant that players could easily delete assets and flags on the machine and ruin the experience for others.
The concept


I am a big fan of Python Flask. It is versatile, gives you a lot of freedom to explore and create whatever comes to mind, easy to understand if you have basic Python knowledge. In this chapter We will explore how to deploy your own flask application, how it works and some challenges I face when making the ToDo App.
How to host and run your own Flask application
Making a basic web application is not hard at all. Under this text is a basic approach on how to do it yourself.
Snake in a bottle
Breakdown
app = Flask(__name__)
This line creates the instance of the web application you are running. It helps flask know where its endpoints are and which endpoints should be used by this instance and which should be used by other flask instances.
@app.route('/')
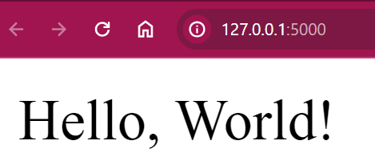
def hello_world():
return 'Hello, World!'
Here we tell the application that the hello_world function must be used in the app instance.
if name == '__main__':
app.run(debug=True)
Here we run the app instance and makes it possible for the client to call the endpoints we have specified.

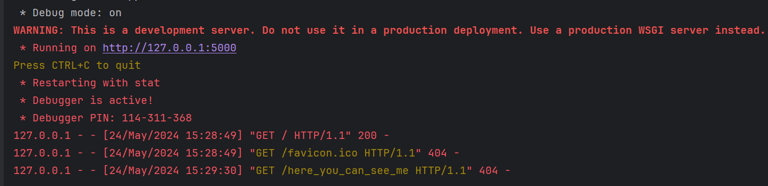
Here we can see the website deployed! In the window you are running the application, you can see every request landing on the website. This is great for monitoring the traffic during a CTF or when hosting APIs on your local client.
The basic idea is that when you call the "/" endpoint, you will get whatever Flask is told to share with you on the browser you are hosting.
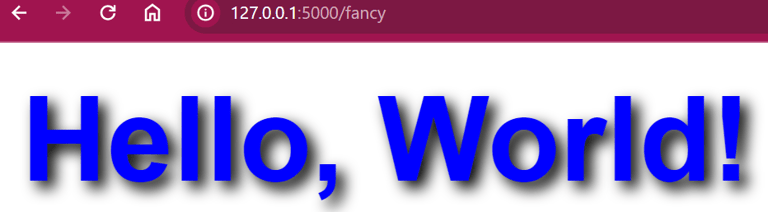
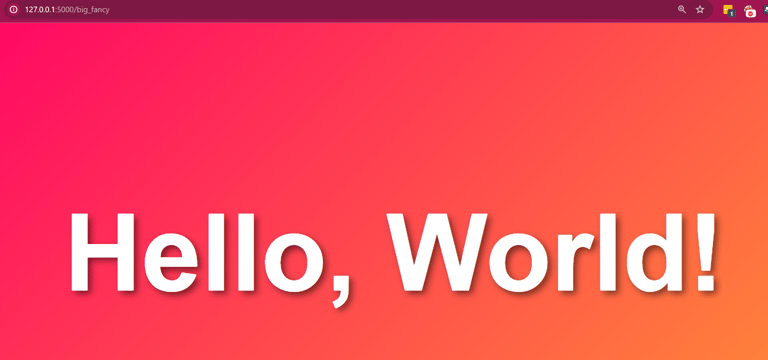
Let us make a fancy Hello World as an example on how you can implement CSS into the HTML!
@app.route('/fancy')
def hello_world_fancy():
return '<h1 style="color: blue; font-family: Arial, sans-serif; text-shadow: 2px 2px 4px #000000;">Hello, World!</h1>'

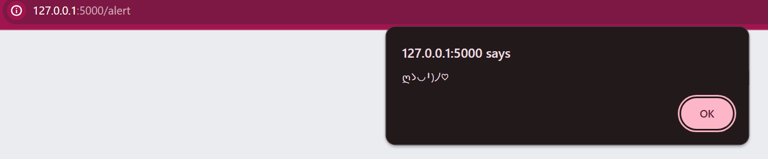
And before you even ask, yes of course you can run javascript!:
@app.route('/alert')
def alert():
return '<script>alert("ღゝ◡╹)ノ♡")</script>'
As you can imagine, you can really go bananas and make anything with this.
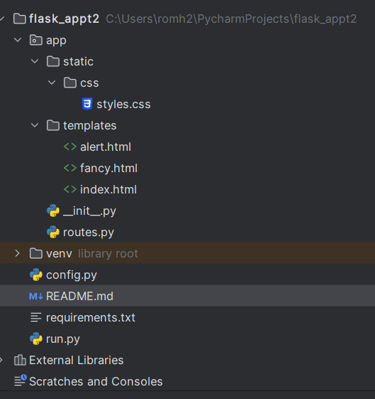
But making so many lines of code in every single function will quickly clutter your code and make it hard to use in the future. So let us make a proper structure:
flask_app/
│
├── app/
│ ├── init.py
│ ├── routes.py
│ ├── templates/
│ │ └── index.html
│ └── static/
│ └── css/
│ └── styles.css
│
├── config.py
├── run.py
├── requirements.txt
└── README.md
Going more into detail on what to add inn all the different files would make this a very long blog entry, so here is a link to the github where you can download the template repo and explore it yourself! Have fun and use the structure to make your own web app! °˖✧◝(⁰▿⁰)◜✧˖°
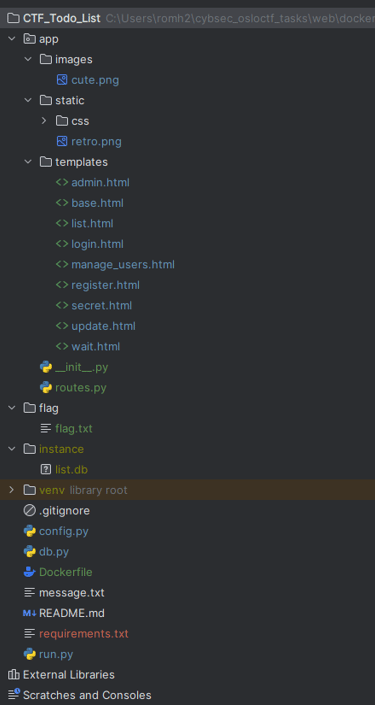
Structure of the TODO
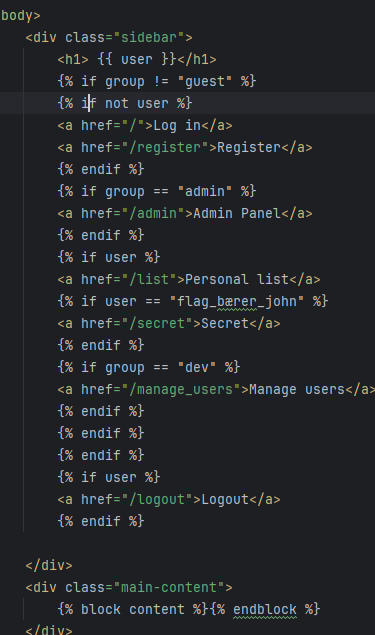
This is how the structure of the TODO web application looks like. (I have been working with it after the CTF, so its a bit cleaner now than before).
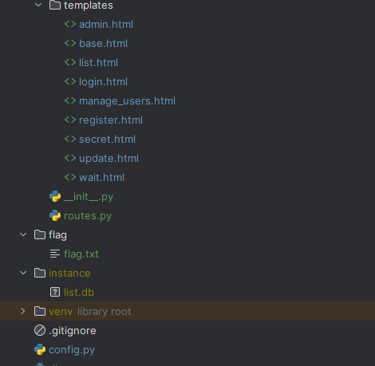
I have followed the base structure of the template shared above. If you have an experienced eye, you will notices that the images directory and flag directory is outside of the static directory, which means that they should not be reached from the application as they are not in the resource directory. This is done intentionally for the LFI challenge.
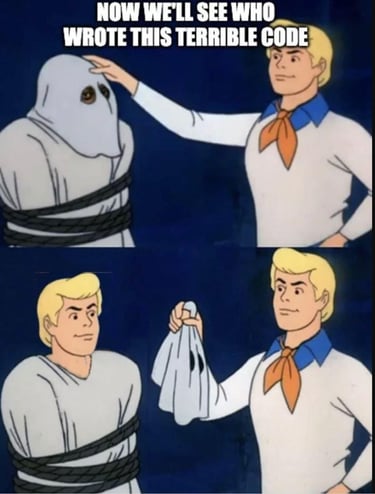
I have made plenty of html files which has Javascript, CSS and Python logic integrated within them. Learning how to do this properly has been difficult and I had to read plenty of documentation and ask AI to explain me the logic as I worked on it, but I am quite happy with the result. But I am very sure that there are more prettier and more efficient ways of doing a lot of the logic. Here is an ugly example where I filter what the users can see based on their role and/or name.

Explore the files yourself
If you want to dig into the logic and source code yourself, have a look! Everything is on my Github page. I am open for feedback, so if you are sitting on any valuable knowledge I can use to improve the application and would like to share it with me, feel free to reach out on my mail or Discord!
Link: https://github.com/SpaceyLad/CTF_Todo_List
If you want to try the app yourself, wait until you have read the next part ;)


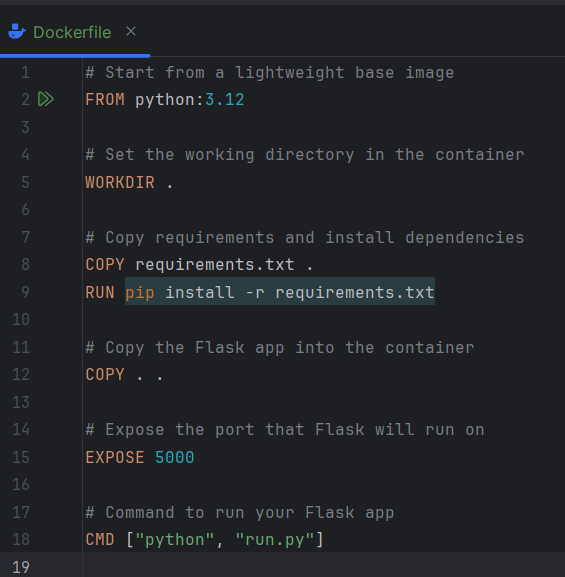
The Dockerfile
The dockerfile is the instructions the docker instance will run when deploying. You do not need to be a docker wizard to make a simple dockerfile like we are going to use now. The dockerfile for the TODO application looks like this and can be found inside of the repository mentioned earlier. I make sure to add plenty of verbose comments to make sure I understand the dockerfile in the future if I ever come back to it.
Dockerize the application
Dockerize the App
Actually making a docker instance out of the Flask application is not to difficult, but it requires you to remember the syntax yourself, something I am quite bad at. So I have a little ref sheet in my private Notion notes, but if I am very unsure, I ask GPT to help me.
Here is how you can deploy the Todo Application in as a Docker instance on your own machine:
Install (Link in the glossary), then start docker
Go to the working directory the application is
Run this command:
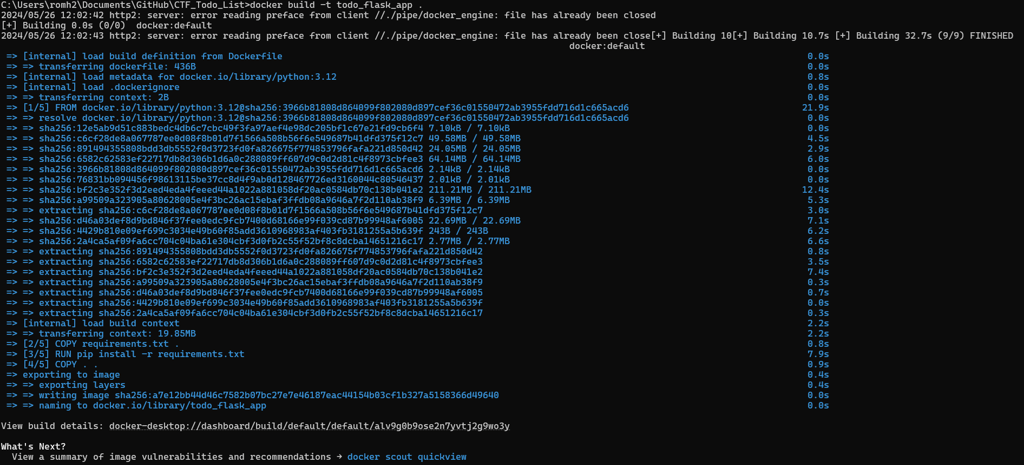

Then Docker will do its magic and follow the instructions you provided!
Run the App
To run the application, you can use the following. The application will be launched on the port provided, and you can visit it on your localhost IP address!
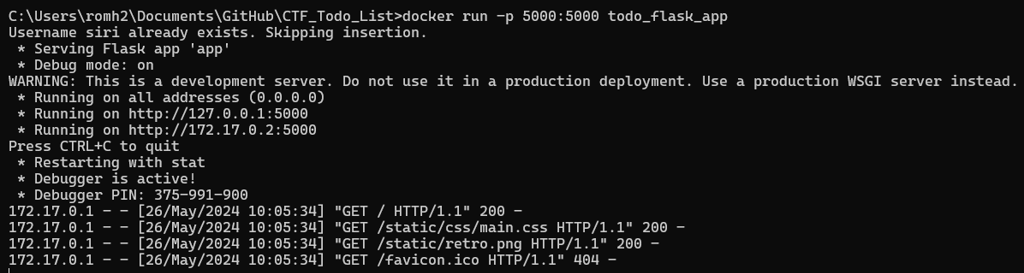
Now you can try to hack the application as an external user! Are you able to find all the flags? (¬‿¬)
Here is a short and sweet writeup on how to exploit the different vulnerabilities and get the flags. If you still haven't tried the challenge yourself, I highly recommend giving it a try before reading this! And well, if you have found the flags and want to know the intended way, or found it too difficult, have fun reading and see if you can pull it off yourself!
Note that I am using Firefox alone to perform all, except 1 attack.
Full TODO Application CTF Writeup ╰( ^o^)╮
HTML manipulation
This is the easiest vulnerability to exploit. The server relies on the front end to do the filtering and restrictions, which is a mistake as we, the "hackers", can trick the front end, which will not be stopped as the backend simply accepts anything and does as it is told. We can do this in 2 ways:
Change role in POST request
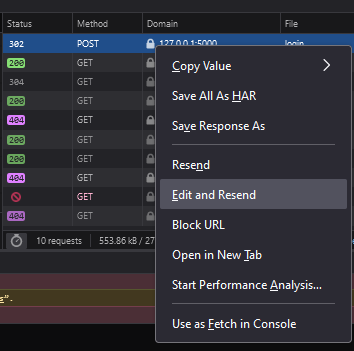
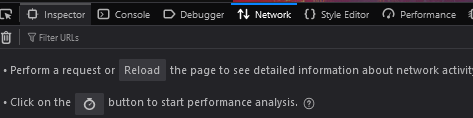
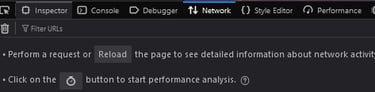
To pull this off, click the "register" button and write in username and password for the malicious account. Before you do anything, open the console window with "ctrl + shift + i", go to network and press "reload", now you should be able to see all request happening in the background. This is important as we are going to perform the attack without Burp Suite.
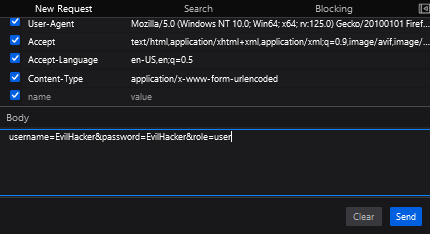
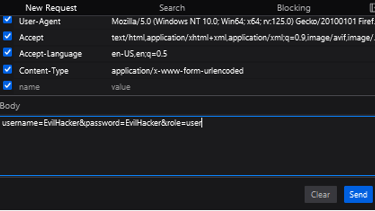
We will use "SpaceyLad" and "SpaceyLad" (You know... After 3 years learning about security, we gotta make secure account... (◑‿◐)), and make the account. But wait! This is just a fake account to get the request we need to perform the actual attack! Find the POST request that sends the packet. Right click it and press "edit and resend".
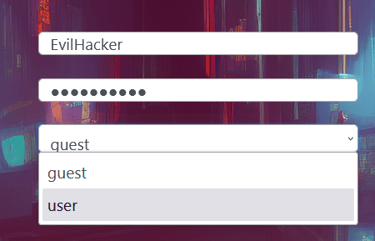
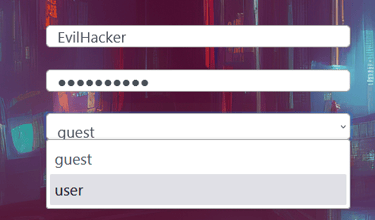
Find the data you sent to the server and... Oh my! We can actually modify what we send! I changed the username and password of the user to: "EvilHacker" and the role to "user". Log into the new user and voila! You have bypassed the admin check!
Enable the drop down menu
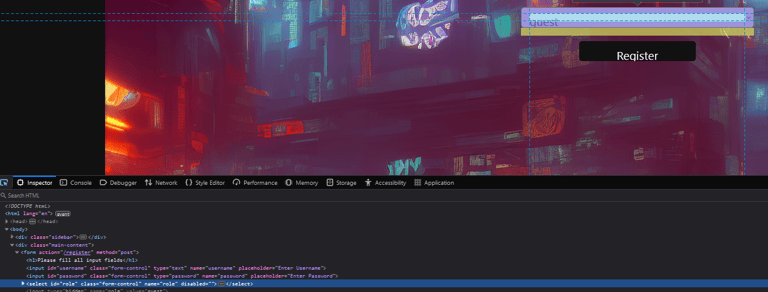
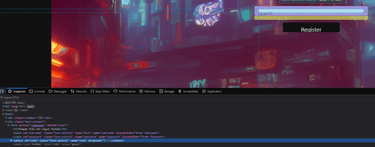
The other method is quite easy. Open the console window (ctrl + shift + i) but this time go to inpector. With inspector, click the disabled dropdown menu. This will highlight where in the front end code you are looking.
Notice the "disabled" setting on the dropdown... What happens if we simply remove it? Now we can use the dropdown and become a user! Wooh! We got our first flag!
You can find more info about this in the glossary!
Remidiation
This is a client-side vulnerability, and there is not much you can do to stop a client from crafting malicious payloads. The solution here is to not rely on the client to not be malicious, but have the backend perform a check on the incomming request. For example make it impossible to become a user unless the username is allow-listed by an admin.
IDOR
This one is another "if you know, you know" kind of vulnerability. It is written in the name, but it is very easy to spot.
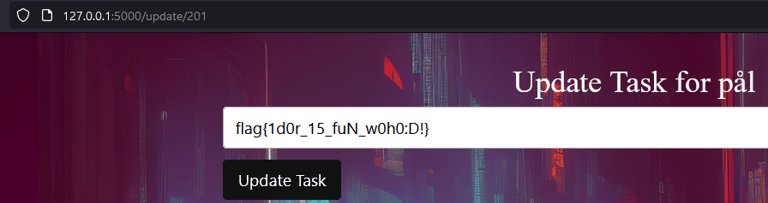
If you add a comment (Can be whatever you feel like) and press the "update" button, notice the structure of the given URL:
http://127.0.0.1:5000/update/215
The backend checks if you are logged inn and have a valid JWT token, but it does not check if you are the correct user. This means that you can check any posts based on their ID! In our case, we have ID 215 which makes me assume that it is auto incrementing the ID with each post. Lets see what happens if I jump down to 214... And voila! We can see that Sofia needs to clean her house!
If we keep exploring the different notes, we will eventually find one with the flag! (´◡`)


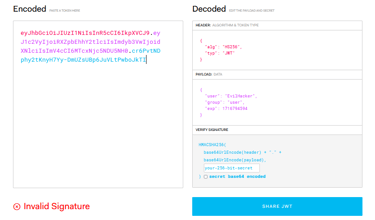
JWT-Secret Cracking
This vulnerability is not easy to guess, especially if you are not familiar with how JWT works. When making the task, I called it "jwt-cracker" which is the tool I wanted them to use, and in the hints, I added an URL to Portswiggers blog about JWT attacks.
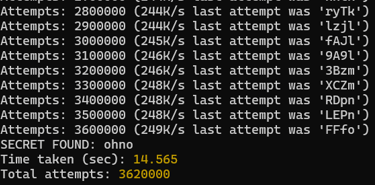
This one is quite simple. You download and run jwt-cracker on an valid session token from the application, and after a handful of seconds, it is cracker and you have the secret!
flag{ohno}
To explain the secret inn this case; This application uses a HS256 signature to sign the token, the HS stands for HMAC and is a string. You can look at it as a password that you need to apply to modify the token itself.
Remidiation
Use RS256 which is a asymmetrical encryption. The attacker needs to get their hands on the private key, which can be stored in a secure place. Another solution is to use a very difficult key to crack. No human is going to remember the secret, so it can be something like a sha256 hash.

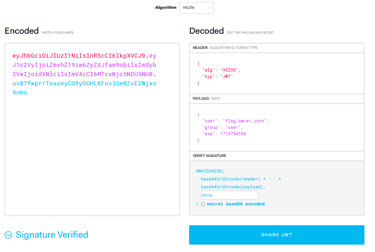
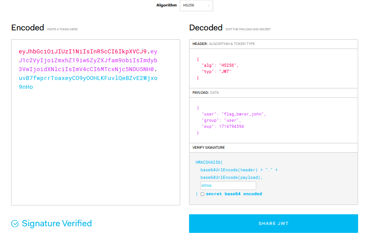
Account takeover
With the new knowledge we gained, we can modify the JWT token and become anyone! In the task description, it states that we should try to become "flag_bærer_john".
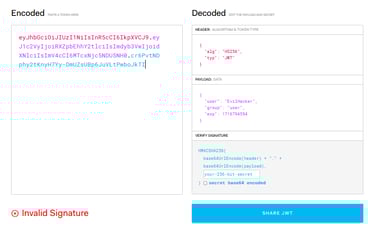
To do this, we have to visit jwt.io . This tool lets us decode our token so we can understand what kind of information about us the website is using. We can see our username, role and when the token expires.
Let us try to modify the token... We change the username to "flag_bærer_john".. Add the secret... And voila! We have a new token! We apply the token to our app cache and refresh the website. This leads us become the user we specified. With this, we can visit the secret page, containing the flag.


[Extra] LFI
This challenge goes outside of the attack chain we have performed so far, but in a real scenario, would be devastating.
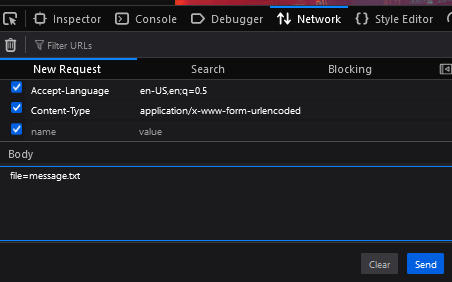
To start this attack, lets make a new user. This time we use lfi:lfi, and it will be registred as a guest. In the guest waiting area, we there is a button that lets us fetch a waiting message from an admin.
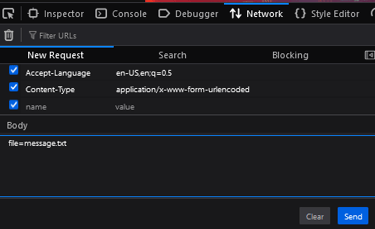
Open the console window (ctrl + shift + i) and go to the network tab. Reload the page and press the button that fetches the message. Like we did in the HTML writeup, right click the request and press the "edit and resend" button, and check the payload.
Hmm... It is fetching a message.txt file from somewhere in the system... What if... We change it to flag/flag.txt? (Which is clearly hinted on in the task text). And bam! We managed to steal the flag! (✯◡✯)
If you try to look at any other files in the system, you will get a sneaky error message, as I wanted to prevent players from reading the run.py file, which would give away all the flags, but this can easily be modified in the code if you build the docker yourself.
Remediation
Do not call files outside the static directory. This is a restricted directory made to hold files that is to be viewed by the application, if you read any other file using the "open()" function, it may lead to LFI if not done properly.


Thank you for reading!
This is the longest blog post I have ever written, so if you read it all, I hope you learned something new! (─‿‿─)♡


Glossary
CTF (Capture The Flag): A cybersecurity competition where participants solve challenges to find hidden flags, testing skills in cryptography, web vulnerabilities, and more.
PWN: Slang for successfully exploiting or taking control of a system, often used to describe a successful hack or vulnerability demonstration.
IDOR (Insecure Direct Object Reference): A vulnerability where an attacker can access restricted resources by modifying a reference, such as a URL parameter, to an object they shouldn't have permission to access.
JWT (JSON Web Token): A compact, URL-safe token used for securely transmitting information between parties, often used for authentication and authorization in web applications.
LFI (Local File Inclusion): A vulnerability that allows an attacker to include files on a server through the web browser, potentially leading to the execution of malicious files or exposure of sensitive data.
RCE (Remote Code Execution): A critical vulnerability that allows an attacker to execute arbitrary code on a remote server, potentially taking full control of the affected system.
XSS (Cross-Site Scripting): A vulnerability where an attacker injects malicious scripts into webpages viewed by others, leading to data theft, session hijacking, or other malicious actions.
Links
https://owasp.org/www-project-top-ten/
https://flask.palletsprojects.com/en/3.0.x/
https://www.docker.com/products/docker-desktop/
https://owasp.org/Top10/A01_2021-Broken_Access_Control/
https://cheatsheetseries.owasp.org/cheatsheets/Insecure_Direct_Object_Reference_Prevention_Cheat_Sheet.html
https://portswigger.net/web-security/jwt
Software & Tools
https://github.com/lmammino/jwt-cracker
https://jwt.io/